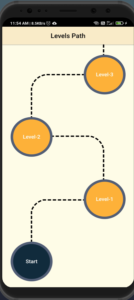
In my most recent project, I was asked to create scrollable path between GridView children widgets. The Flutter CustomPaint Widget allows us to make a highly personalized user interface with interesting animations and this widget also offers you access to low-level graphics. So, in this article, I’ll walk you through the steps I took to achieve this.

Create a class LevelsScreen extends StatefulWidget .In the Build method return the scaffold and add a GridView.builder() inside the body. Then create a List which we use to create Gridview using GridView.builder()
List<String> levels = [
    'Start',
    'Level-1',
    'Level-2',
    'Level-3',
    'Level-4',
    'Level-5'
  ];
Give the itemCount as the length of the list we just created. itemBuilder will return the circular containers on which we display the text from the list.
GridView.builder(
       itemCount: levels.length,
       reverse: true,
       shrinkWrap: true,
       physics: const BouncingScrollPhysics(),
       gridDelegate: const SliverGridDelegateWithFixedCrossAxisCount(
            crossAxisCount: 1, childAspectRatio: 2),
       itemBuilder: (BuildContext context, int index) {
            return Row(
                  mainAxisAlignment: (index % 2 == 0)
                      ? MainAxisAlignment.start
                      : MainAxisAlignment.end,
                  children: [
                    Padding(
                      padding: const EdgeInsets.symmetric(horizontal: 25),
                      child: Container(
                        height: 125,
                        width: 125,
                        decoration: BoxDecoration(
                          color: Colors.black,
                          borderRadius: BorderRadius.circular(62.5),
                        ),
                        child: Center(
                          child: Container(
                            height: 110,
                            width: 110,
                            decoration: BoxDecoration(
                              color: (index == 0)
                                  ? Colors.green
                                  : Colors.amberAccent,
                              borderRadius: BorderRadius.circular(55),
                            ),
                            child: Center(
                              child: Text(levels[index],
                                  style: const TextStyle(
                                      fontSize: 16,
                                      fontWeight: FontWeight.w600)
                              ),
                           ),
                        ),
                     ),
                  ),
              ),
          ],
      );
   },
 ),
Step 2: Create a class “DashLinePainter” that extends “CustomPainter”
Then we create a new class DashLinePainter that extends CustomPainter ,in which we define the Paint with the required color, strokeWidth and style .Later inside the paint method define the Path.
class DashLinePainter extends CustomPainter {
  final Paint _paint = Paint()
    ..color = Colors.black
    ..strokeWidth = 4.0
    ..style = PaintingStyle.stroke
    ..strokeJoin = StrokeJoin.round;

  @override
  void paint(Canvas canvas, Size size) {
    var path = Path()
      ..moveTo(size.width / 4.5, size.height / 1.09)
      ..lineTo(size.width / 4.5, size.height / 1.28)
      ..arcToPoint(Offset(size.width / 3.2, size.height / 1.33),
          radius: const Radius.circular(50), clockwise: true)
      ..lineTo(size.width / 1.3, size.height / 1.33)
      ..lineTo(size.width / 1.3, size.height / 1.62)
      ..arcToPoint(Offset(size.width / 1.5, size.height / 1.72),
          radius: const Radius.circular(50), clockwise: false)
      ..lineTo(size.width / 4.5, size.height / 1.72)
      ..lineTo(size.width / 4.5, size.height / 2.2)
      ..arcToPoint(Offset(size.width / 3, size.height / 2.4),
          radius: const Radius.circular(50), clockwise: true)
      ..lineTo(size.width / 1.3, size.height / 2.4)
      ..lineTo(size.width / 1.3, size.height / 3.5)
      ..arcToPoint(Offset(size.width / 1.45, size.height / 4),
          radius: const Radius.circular(50), clockwise: false)
      ..lineTo(size.width / 4.5, size.height / 4)
      ..lineTo(size.width / 4.5, size.height / 8.5)
      ..arcToPoint(Offset(size.width / 3.2, size.height / 11),
          radius: const Radius.circular(50), clockwise: true)
      ..lineTo(size.width / 1.3, size.height / 11);
    Path dashPath = Path();
    double dashWidth = 10.0;
    double dashSpace = 5.0;
    double distance = 0.0;
    for (PathMetric pathMetric in path.computeMetrics()) {
      while (distance < pathMetric.length) {
        dashPath.addPath(
          pathMetric.extractPath(distance, distance + dashWidth),
          Offset.zero,
        );
        distance += dashWidth;
        distance += dashSpace;
      }
    }
    canvas.drawPath(dashPath, _paint);
  }
  @override
  bool shouldRepaint(DashLinePainter oldDelegate) => true;
}
Step 3: Wrap “GridView.builder()” with “CustomPaint”
To show the path between gridView children, we wrap the GridView.builder with CustomPaint and pass the painter as DashLinePainter.
CustomPaint(
     painter: DashLinePainter(),
     child: GridView.builder(<Code>),
  )
Step 4: Make the path scrollable
Now to make the path scrollable along with the gridView children we need to wrap the customPaint with SingleChildScrollView and give any scroll physics .
SingleChildScrollView(
     physics: const BouncingScrollPhysics(),
     child: CustomPaint(
     painter: DashLinePainter(),
     child: GridView.builder(<code>),
    ),
  ),
Output
You can get the complete code on GitHub, and the GIF below demonstrates how scrollable path using CustomPaint works.

Conclusion:
I’ve discussed how to create scrollable path using CustomPaint in this article, and you can adapt this code to match your requirements. This was just a quick introduction to drawing scrollable paths using CustomPaint from my perspective, and how it works with Flutter. I hope that this blog has given you enough information to try out scrollable paths in Flutter in your own projects.

